2. Plugin Development
2.1. Introduction
Risiko contains a plugin system that allows complex impact functions to be implemented in Python (http://www.python.org) whilst (ideally) minimizing the need to understand all the complexity of the handling the hazard and exposure layers. Features of the Risiko plugin system are:
- Auto registration of new plugins after restart
- Derivation of more complex plugins from simpler ones
- Auto hiding for plugins that could not be run (depending on the requirements)
- Allow for additional functionality to be added easily
- Provide uptodate documentation on plugin functionality
For details about the internal workings of the plugin subsystem please consult the developers guide in section Plugin Manager. There are also many examples in this section showing plugins used for earthquake, tusnami and flood which can act as templates for your own plugins.
2.2. Writing a Simple Raster Plugin: Tutorial 01
This section provides a beginners tutorial on writing a simple earthquke impact plugin from scratch. You will need to be familiar with the basics of Python to be able to write and debug plugins - if you are new to Python the standard Python tutorial is a great place to start (http://docs.python.org/tutorial/).
For this plugin we want to calculate a simple impact by using the following function of the severity of hazard (i.e. the amount of ground shaking - H) by the exposure (i.e. the number of people in that area - P). e.g.:
Impact  = 10 ** (a * H - b) * P

where
      H: Raster layer of MMI ground shaking
      P: Raster layer of population data on the same grid as H
      a,b: Parameters that were tuned from real world data
2.2.1. Defining the impact class
As the first step we need to define the plugin class.:
class SimpleImpactEarthquakeFunction(FunctionProvider)
Every plugin must be subclassed from FunctionProvider. This is the method of registration for the plugin and allows the Risiko Plugin Manager to know what plugins are available.
2.2.2. Impact Parameters
Each plugin needs to be used in the correct context. Using a flood impact function for earthquakes will likely yield misleading results at best! As such pugins may have a variety of conditions that need to be met before they can be run. Such conditions may include:
- The type of hazard
- The type of exposure
- The form of the layer data (raster or vector)
- The measure or unit type of a layer
- Any other meta data defined in the layer
In the future plugins may also support filtering by: * The geographic location * The avaliable layer meta data
Risiko will try to show users only those plugins that can be validly run.
These parameters required to run the plugin, and indeed all parameters specific to the plugin, are defined in the doc string of the class:
class SimpleImpactEarthquakeFunction(FunctionProvider):
   """Simple plugin for earthquake damage

   :author Allen
   :rating 1
   :param requires category=='hazard' and \
           subcategory.startswith('earthquake') and \
           layer_type=='raster'
   :param requires category=='exposure' and \
           subcategory.startswith('population') and \
           layer_type=='raster'
   """
This tells the Risiko plugin manager that this plugin requires at a minimum inputs of
- category of ‘hazard’, with a layer subcategory of ‘earthquake’ and it must be a layerType of ‘Raster’
- category of ‘exposure’, with a layer subcategory of ‘earthquake’ and it must be a layerType of ‘Raster’
The require expression can be any artibary python expression that can be evaluated.
Note
- Lines can be broken using the line continuation character ‘\’ at the end of a line
- If any one of the conditions is not met the plugin will not be visible from the impact selection box.
2.2.3. The calculation function
Each plugin must then define a run method which is the plugin execution code:
@staticmethod
def run(input):
The parameters are passed in as a dictionary. It is up to the framework to populate the dictionary correctly in this case with keys containing relavent data for the exposure and hazard.:
@staticmethod
def run(layers,
        a=0.97429, b=11.037):
    """Risk plugin for earthquake fatalities

    Input
      layers: List of layers expected to contain
          H: Raster layer of MMI ground shaking
          P: Raster layer of population data on the same grid as H
    """

    # Identify input layers
    intensity = layers[0]
    population = layers[1]

    # Extract data
    H = intensity.get_data(nan=0)
    P = population.get_data(nan=0)

    # Calculate impact
    F = 10 ** (a * H - b) * P

    # Create new layer and return
    R = Raster(F,
               projection=population.get_projection(),
               geotransform=population.get_geotransform(),
               name='Estimated fatalities')
    return R
At the end of the function the calculated impact layer R is returned. This return layer in our example is a Raster layer the correct projection for this layer is ensured by passing in the input layer projections.
2.2.4. Installing the plugin
The whole plugin file will now read:
from impact.plugins.core import FunctionProvider
from impact.storage.raster import Raster

class SimpleImpactEarthquakeFunction(FunctionProvider):
        """Simple plugin for earthquake damage

        :author Allen
        :rating 1
        :param requires category=='hazard' and \
                        subcategory.startswith('earthquake') and \
                        layer_type=='raster'
        :param requires category=='exposure' and \
                        subcategory.startswith('population') and \
                        layer_type=='raster'
        """

        @staticmethod
        def run(layers,
                a=0.97429, b=11.037):
            """Risk plugin for earthquake fatalities

            Input
              layers: List of layers expected to contain
                  H: Raster layer of MMI ground shaking
                  P: Raster layer of population data on the same grid as H
            """

            # Identify input layers
            intensity = layers[0]
            population = layers[1]

            # Extract data
            H = intensity.get_data(nan=0)
            P = population.get_data(nan=0)

            # Calculate impact
            F = 10 ** (a * H - b) * P

            # Create new layer and return
            R = Raster(F,
                       projection=population.get_projection(),
                       geotransform=population.get_geotransform(),
                       name='Estimated fatalities')
            return R
If this is saved as SimpleImpactEarthquakeFunction.py
Since its an earthquake plugin save the code into the following directory:
[root risiko dir]/riab/riab/impact/plugins/earthquake directory.
Then restart Risiko using:
risiko-stop
risiko-start
Note
Once the plugin has been registered you will not need to restart when you make changes to the plugin.
2.2.5. Testing the plugin
If you now go to your local Riskio install (by default 127.0.0.1:8000) you can select the following from the demo data:
- Earthquake ground shaking
- Glp10ag (Population for Indonesia)
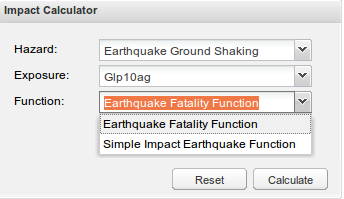
Figure 1. The parameter selection box.
Note
If you don’t see any demo data please follow the quick start instructions Development installation.
You should see your impact function in the fuction selection box as Simple Impact Earthquake Function. The Plugin name shown here is derived from the plugin class name SimpleImpactEarthquakeFunction.
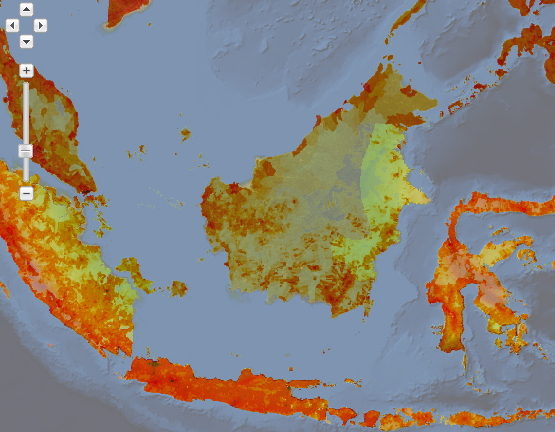
Figure 2. The demo data for the hazard and population shown.
Then click on calculate.
If, after a few seconds, you see a new layer appear showing estimated fatalities then congratulations!
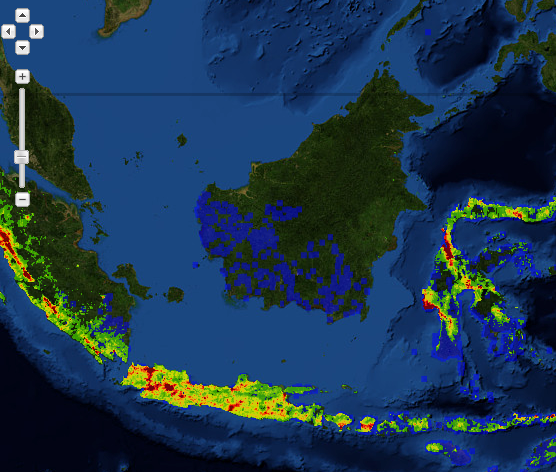
Figure 3. The fatality impact calculated using our simple impact function
If you get an error please check you have carefully followed the instructions above (Installing the plugin).
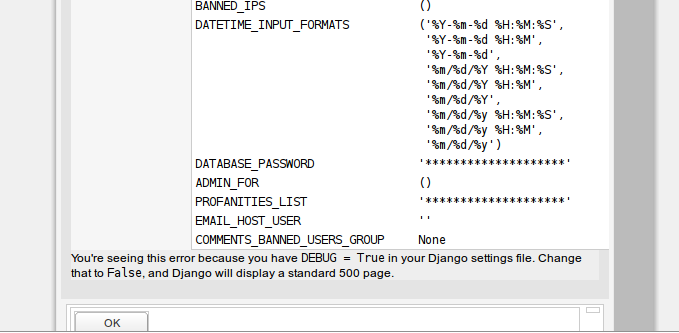
Figure 4. An example syntax error in the plugin.
Note
FIXME: Include some information about the error logging file
2.3. Writing a Simple Vector Plugin: Tutorial 02
For the next tutorial we will look at a flood impact plugin. This plugin differs from the above tutorial as it deals with vector data and also applies styling to the output.
Note
FIXME: Include more description about the various components of the plugin.
The plugin code is:
from django.template.loader import render_to_string
from impact.plugins.core import FunctionProvider
from impact.storage.vector import Vector
from django.utils.translation import ugettext as _
from impact.plugins.utilities import PointZoomSize
from impact.plugins.utilities import PointClassColor
from impact.plugins.utilities import PointSymbol
import scipy.stats
class FloodBuildingImpactFunction(FunctionProvider):
"""Risk plugin for flood impact on building data
:param requires category=='hazard' and \
subcategory.startswith('flood') and \
layer_type=='raster' and \
unit=='m'
:param requires category=='exposure' and \
subcategory.startswith('building')
"""
target_field = 'AFFECTED'
def run(self, layers):
"""Risk plugin for tsunami population
"""
# Extract data
# FIXME (Ole): This will be replaced by a helper function
# to separate hazard from exposure using keywords
H = layers[0] # Depth
E = layers[1] # Building locations
# Interpolate hazard level to building locations
H = H.interpolate(E)
# Extract relevant numerical data
coordinates = E.get_geometry()
depth = H.get_data()
N = len(depth)
# List attributes to carry forward to result layer
attributes = E.get_attribute_names()
#print attributes
#print 'Number of population points', N
# Calculate population impact
count = 0
building_impact = []
for i in range(N):
dep = float(depth[i].values()[0])
# Tag and count
if dep > 0.1:
affected = 99.5
count += 1
else:
affected = 0
# Collect depth and calculated damage
result_dict = {'AFFECTED': affected,
'DEPTH': dep}
# Carry all original attributes forward
for key in attributes:
result_dict[key] = E.get_data(key, i)
# Record result for this feature
building_impact.append(result_dict)
# Create report
caption = ('<table border="0" width="320px">'
' <tr><th><b>%s</b></th><th><b>%s</b></th></th>'
' <tr></tr>'
' <tr><td>%s:</td><td>%i</td></tr>'
' <tr><td>%s (> 10 cm) :</td><td>%i</td></tr>'
' <tr><td>%s (< 10 cm) :</td><td>%i</td></tr>'
'</table>' % (_('Buildings'), _('Total'),
_('All'), N,
_('Inundated'), count,
_('Not inundated'), N - count))
# Create vector layer and return
V = Vector(data=building_impact,
projection=E.get_projection(),
geometry=coordinates,
name='Estimated buildings affected',
keywords={'caption': caption})
return V
def generate_style(self, data):
"""Generates and SLD file based on the data values
"""
DEFAULT_SYMBOL = 'circle'
symbol_field = None
symbol_keys = [None, '']
symbol_values = [DEFAULT_SYMBOL, DEFAULT_SYMBOL]
scale_keys = [10000000000, 10000000, 5000000, 1000000,
500000, 250000, 100000]
scale_values = [5, 5, 5, 5, 5, 8, 14]
class_keys = ['Not affected', 'Greater than 10 cm']
class_values = [{'min': 0, 'max': 90,
'color': '#cccccc', 'opacity': '0.2'},
{'min': 90, 'max': 100,
'color': '#F31a0c', 'opacity': '1'}]
if self.symbol_field in data.get_attribute_names():
symbol_field = self.symbol_field
symbol_keys.extend(['Church/Mosque', 'Commercial (office)',
'Hotel',
'Medical facility', 'Other',
'Other industrial',
'Residential', 'Retail', 'School',
'Unknown', 'Warehouse'])
symbol_values.extend([DEFAULT_SYMBOL, DEFAULT_SYMBOL,
DEFAULT_SYMBOL,
DEFAULT_SYMBOL, DEFAULT_SYMBOL,
DEFAULT_SYMBOL,
DEFAULT_SYMBOL, DEFAULT_SYMBOL,
DEFAULT_SYMBOL,
DEFAULT_SYMBOL, DEFAULT_SYMBOL])
params = dict(name=data.get_name(),
damage_field=self.target_field,
symbol_field=symbol_field,
symbols=dict(zip(symbol_keys, symbol_values)),
scales=dict(zip(scale_keys, scale_values)),
classifications=dict(zip(class_keys, class_values)))
return render_to_string('impact/styles/point_classes.sld', params)
[https://github.com/AIFDR/riab/blob/develop/docs/usage/plugins/development.rst]